Tying ourselves in knots
Knots For Sailing
Why do we use special knots for sailing?
The short answer is that over a long period of time, the best knots for most jobs have already been found and agreed. The important things about the knots we use are:
- They're reasonably easy to tie.
- They're suitably secure for the job they are doing.
- They are easy to untie.
- They don't 'jam' or 'lock up' unless we want them to.
Fortunately, for most purposes, we need to remember only a few knots, though it's also a good idea to know of some special knots and know how or where to find out how to tie those if we need them. I keep a small book of knots on my boat for just those times.
Here is a list the knots I use most often. After that I'll discuss their advantages and disadvantages, and I'll supply some links for you to see how they're tied.
- Bargeman's Hitch (which has many names)
- Bowline
- Cleat Hitch
- Clove Hitch
- Stevedore knot (*)
- Reef knot or Square knot
- Round Turn and Two Half Hitches
(*) I believe the Stevedore knot is much better in almost every way than the more familiar figure eight knot. I'll explain that below.
Actually you can manage without knowing most of those, but you must really be able to find the method and tie them when you need them.
Plus a few more that you should also try to learn, we don't use them often, but they are sometimes very useful.
- Rolling Hitch
- Sheet Bend and it's double version.
- Cow Hitch with toggle
Some resources that I can highly recommend:
"The Ashley Book Of Knots", which is generally recognise as the bible of knots, but is often both difficult to find and expensive in print. It's also rather large to keep on most boats and has very many knots we'd likely never use. It is now in the public domain as a PDF and in several other formats. This book includes a number of decorative and similar knots, including baggy-wrinkle, matting, fenders, sennits, tassels, handles, netting and all manner of other things.
"Essential Knots and How To Tie Them" excellent, clear and informative videos
"Animated Knots by Grog", An excellent website that animates how to tie nots. The animation can run as a 'video', or can be stepped-through, one stage at a time.
"A Handbook Of Knots" by Des Pawson. Des is passionate about all things knotty and a great authority. Dorling Kindersley, the publishers, seem always to do a good job. This is the book I keep on board.
"Wikipedia Knots" and "Wikibooks knots"
A little terminology.
It isn't important to know this, but it can be helpful when trying to understand the job for which a knot is expected to be used, and also some common terms that make better a understanding of how to tie knots.
Knots
We use this word all the time for all of the following, but it does have a specific meaning: Knots are used to 'bend' a rope to itself. So when you tie your shoelaces, you are tying a knot in the correct sense of the word. This word also includes most of the loops like the bowline, and most of the stoppers like the Stevedore knot.
In practice, of course, we use the word in a very general way, and generally that doesn't matter.
Bends
Bends are used to secure together two ropes.
Hitches
Hitches are used to attach or 'bend' a rope to an object such as a spar, a ring or a cleat.
Parts of ropes when tying knots.
Working part
When you are tying rope, there are two main 'parts'. The working part is the loose end of the rope.
Standing part
The standing part is the other end away from the working part. Sometimes this will be attached to something, sometimes it will be the long coil of rope that's sitting beside you.
Bight
A open loop of rope. For example, if you hold the standing part of the rope in one hand and the working part of the same rope in the other hand, then bring your hands near to each other so that the rope hangs down, it forms a bight.
Loop
A loop is where the rope forms a complete circle and the standing working part passes over or under the standing part.
Turn
A turn is really just a loop that goes around an object.
Round Turn
A round turn is similar, but is formed of two turns around the object.
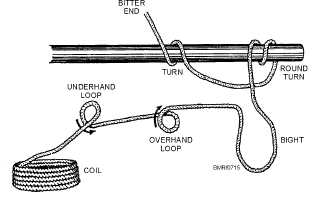
In this image the 'bitter end' is the working part, and the coil is the standing part. I'm not sure that those two words are helpful in this diagram. I'll try to explain better elsewhere.
Image from http://navyadvancement.tpub.com
Hitches
A very nice video showing these and more: Essential Knots ... Hitches.
Half Hitch
Important! This is not a secure hitch in it's own right. It is always used with some other knot. Two of these tied in the same direction for a clove hitch as we'll see shortly. The animation by Grog is actually of a turn and half-hitch, because without the turn, there really is nothing to see. The 'turn' is just the rope passed once around the object, so the half-hitch proper is just that little loop on top of it. Tug on this a bit and it's very likely to undo after a while.
How to tie: (Turn and) Half Hitch
Round Turn And Two Half Hitches

This modest variation, by contrast, is both very secure, can be tied 'under load', and is one of the strongest easy hitches available. The Round Turn is as in the diagram in the section above, and the two half hitches are made around the standing part. Whilst it can be tied under load, in that condition it is can become very tight and difficult to untie. In many cases, the bargemen's hitch below has a comparable performance, but never jams so can always be untied. One other word of warning. The two half hitches must go around the standing part in the same direction, like the clove hitch below. If you accidentally reverse the second half hitch, forming a Cow Hitch as below, the knot is much less secure.
How to tie: Round Turn And Two Half Hitches.
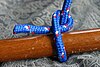
Clove Hitch

This is an easy hitch to tie, by two or three different methods. It's pretty secure, though if the line is likely to be tugged upon quite a lot, it can gradually slip, or it can become very tight. The clove hitch is just the two half hitches as above, but tied around the object, not the standing part of the rope.
How to tie: Clove Hitch using half hitches
How to tie: Clove Hitch using rope end I commonly use this for fenders
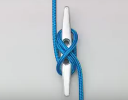
Cleat Hitch
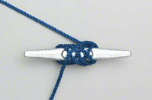
A cleat in this sense is a bar on a stand-off, to which one attaches a rope. They are a simple but clever device, because they allow the rope easily to be wound around the two 'horns', in a figure-of-eight pattern, each 'eight' over the previous one, which nicely secures each figure eight in place. Three figure-eights make a secure attachment. The is very rarely (if ever) a need for a final half hitch as some people add, and that final half hitch can jam. If you really feel a need, I can recommend a slipped half hitch as an alternative.
The following has that final half-hitch. For a slipped half hitch, instead of the end of the rope passing through the half hitch, make a bight of rope and pass that through instead. I'm trying to find a suitable picture to show, but I'm staggered that most people seem to use that half hitch.
How to tie: Cleat Hitch (vertical)
A slipped half hitch to show the idea. If the cleat hitch works tight, this is a bit easier to free.
When used with a coild of rope on a vertical cleat, pin or bollard, the loop formed from this can also then be passed through the loop, hooked over the top of the cleat, etc., and thus used to hold the coil securely.
Bargeman's Hitch
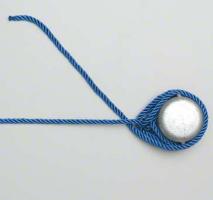
AKA Lighterman's Hitch, Tugboat Hitch, Bollard Hitch, No-Name Hitch and probably others. I think it's so universal and popular that everyone just named it for themselves, or possibly it was so universal but not so obviously a hitch, that nobody even bothered, originally, to name it at all.
It's a slightly scary looking hitch, because it doesn't actually 'tie-off' at all. There are no tucked-in ends or half hitches or anything obvious like that. It's just rope wrapped around a post. But it does work ... extremely well! Iit can be tied under load, it can be untied under load, it never jams, and it can be part untied, 'surged' (the turn(s) allowed to slide a bit), then retied under load. When tied it is secure. And it will do all that on just a single post.
It's very easy to tie, but can confuse when untying unless you know how it's tied.
It's reasonably easy to understand how it works if you try to reimagine it with the post as the 'horns' of a cleat and the standing part as the upright of a cleat. This hitch is really just a round turn with a cleat hitch on top, but with one half 'flipped over' onto itself.
How to tie: Bargeman's Hitch
Rolling Hitch

The Rolling Hitch, the yellow rope in the image above, has the unusual ability to slide fairly easily in one when there is no significant load on it, but can hold a substantial load on the standing part (the yellow rope to the right in the image above. It works much like the toggle on a tent line.
That ability makes it ideal for lines that need adjusting for length, or when you want to take some or all load off of another line. For example if the right-hand end of the red rope is jammed under load from the left, the rolling hitch can take that load and allow you to undo the jam. Look up "riding turn" for one example of this. It can also be used on an anchor chain or mooring buoy, to help keep them from the hull. I personally also use one to make off a flag halyard onto a shroud.
How to tie: "Rolling Hitch"
Sheet Bend and Double Sheet Bend
Sheet Bend
Double Sheet Bend
These are probably the most popular bends for tying together two ropes. They're easy to tie, though it's very important to get the working ends the right way round or the sheet bent is insecure. Tied properly, both are secure. They are also excellent bends for when the ropes differ is size, particularly the double sheet bend, which is ideal for tying a throwing line to a heavy mooring line. Note that the double sheet bend simply has an extra turn. The thinner line should be the red line as shown in the images above.
They are usually easy to untie, though if you expect a very high load, it may be worth looking at the Zeppelin Bend or Carrick Bend.
Just for the record, the Reef Knot or Square Knot is not a good choice for use as a bend as it is not secure, and the Granny Knot, whilst secure, can be impossible to untie. I strongly advise to using them for this purpose.
How to tie: "Sheet Bend and Double Sheet Bend"
Untying: If this knot becomes very tight, it can usually be loosened by pushing the blue bight away over the red standing part, then relax, then push again, possibly several times. This usually works the blue part out a little until the tightness reduces.
The Other Knots from the short list
Bowline

Probably the most popular loop knot. It is secure when tied correctly ... the working end must be inside as shown above, and easy to untie. It can easily be tied one-handed, if necessary around yourself, whilst holding onto the standing part. That could be a life-saver.
It may be a bit trite, but the old reminder works ... "The rabbit comes out of the hole, round the tree and back down the hole."
How to tie: "Bowline"
How to tie: "Bowline (one handed)"
By the way, the extra thumb knot in that animation shouldn't be necessary, but does no harm and might be useful if getting tightness into the knot is difficult for any reason.
Untying: If this knot becomes very tight, it can usually be loosened by pushing the "round the tree" bight forwards over the standing part, then relax, then push again, possibly several times. This usually works the standing part out a little until the tightness reduces.
Stevedore Knot
This is a stopper knot and is quite similar to the figure-eight knot, simply including an extra turn when tiring it.
I personally much prefer it to the figure-eight as it is more secure in use and easier to untie. It's also a little larger, which sometimes is handy.
BTW, a Stevedore is a dock worker and the knot was used when lifting heavy loads on and off of a ship, which is why it had to be very secure (to be safe) and very easy to untie after use.

How to tie: "Stevedore Knot"
Untying: If this knot becomes very tight, it can usually be loosened by pushing the turn closest to the standing part bight forwards over the standing part, then relax, then push again, possibly several times. This usually works the standing part out a little until the tightness reduces.
Figure Eight Knot
For comparison
